LEGO Colosseum Instructions: A Comprehensive Guide
Embark on an epic building journey with 9,036 pieces, making this LEGO Colosseum the most extensive set ever created by the company, surpassing all previous records.
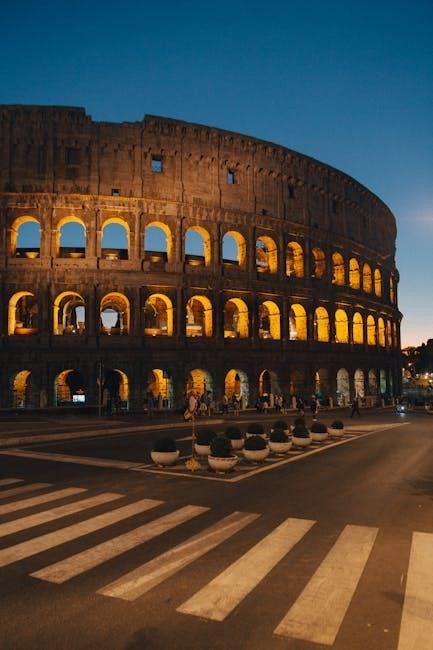
Welcome to the captivating world of the LEGO Colosseum (set number 10276)! This isn’t just a LEGO set; it’s a breathtaking recreation of one of history’s most iconic structures – the Flavian Amphitheatre. Released in late 2020, this model quickly became a sensation amongst LEGO enthusiasts and history buffs alike.

Prepare to be amazed by its sheer scale and intricate detail. Boasting an astounding 9,036 pieces, the LEGO Colosseum currently holds the title of the largest LEGO set ever produced, exceeding the piece count of any previous creation. This model offers a truly immersive building experience, challenging builders of all skill levels. It’s a project that demands patience, precision, and a genuine appreciation for architectural marvels.

This guide will provide a comprehensive walkthrough of the building process, ensuring a rewarding and enjoyable experience as you construct your own Roman masterpiece.
Why Build the LEGO Colosseum?
The LEGO Colosseum offers a unique and rewarding building experience unlike any other. Beyond the sheer satisfaction of completing such a massive and detailed model, it provides a fascinating journey into Roman history and architecture. This set isn’t merely about assembling bricks; it’s about recreating a symbol of an ancient civilization.
With its 9,036 pieces, the build presents a significant challenge, perfect for experienced LEGO builders seeking a complex and engaging project. However, the step-by-step instructions make it accessible even to those relatively new to large-scale LEGO models. The finished Colosseum is a stunning display piece, guaranteed to impress anyone who sees it.
It’s a conversation starter, a testament to your building skills, and a beautiful tribute to a historical landmark.
Understanding the Scale and Piece Count
The LEGO Colosseum (set 10276) is a truly monumental build, boasting an impressive 9,036 pieces. This staggering number immediately signals a complex and time-consuming project, demanding patience and dedication. Its scale is equally remarkable; the model measures over 20 inches (52 cm) in length and 15 inches (39 cm) in width, making it a substantial display piece.
Understanding this scale is crucial for preparation; Ensure you have ample building space before you begin. The sheer volume of pieces requires a methodical approach to sorting and organization. Don’t underestimate the time commitment – this isn’t a weekend build!
The high piece count allows for incredible detail and accuracy in recreating the iconic Roman amphitheater.
Unboxing and Inventory
Upon receiving your LEGO Colosseum (10276), the sheer weight of the box is the first indication of the build ahead! Carefully open the box to reveal a multitude of numbered bags, containing the 9,036 pieces. Resist the urge to immediately dive in; a thorough inventory is essential.
The instruction manual is a substantial volume itself, divided into several books. Cross-reference the piece count listed in the manual with the contents of your box; While rare, discrepancies can occur. Document any missing pieces and contact LEGO customer service immediately.
Take a moment to appreciate the quality of the bricks and the detailed printing. This initial step sets the stage for a rewarding building experience.

Sorting the LEGO Pieces
Given the massive 9,036-piece count, sorting is arguably the most crucial – and time-consuming – step. Don’t underestimate this! Begin by emptying all numbered bags into large containers or trays; Categorize pieces by type: bricks, plates, tiles, arches, and specialized elements.
Further subdivide within each category by color and size. This granular approach dramatically speeds up the building process. Utilize LEGO sorting trays or repurposed containers. A well-organized system prevents frustrating searches during construction.
Consider sorting based on the instruction manual’s build phases. This proactive method ensures you have the necessary pieces readily available as you progress. Patience is key; a little preparation saves significant time later!
Preparing Your Building Space
Considering the Colosseum’s substantial size and the sheer volume of pieces – a staggering 9,036 – dedicating ample building space is paramount. A large, flat surface is essential; a dedicated room is ideal, but a spacious table will suffice. Protect the surface with a drop cloth or large sheet to prevent scratches.
Ensure adequate lighting to easily distinguish colors and piece types. Good ventilation is also important, especially during extended building sessions. Keep drinks and snacks nearby, but away from the build area to avoid spills.
Finally, consider accessibility. You’ll need to move around the model frequently, so ensure clear pathways. A comfortable chair is also highly recommended for this lengthy project!
Phase 1: Building the Foundation
The initial phase focuses on constructing the robust foundation of the Colosseum, a critical step supporting the immense weight and intricate details to come. This stage involves meticulously layering baseplates and specialized bricks, establishing the overall circular shape. Pay close attention to alignment, as any errors here will propagate throughout the build.
Expect repetitive steps, but precision is key. This foundational layer isn’t visually exciting, but it’s structurally vital. The instructions will guide you through creating a solid, interlocking base, preparing for the complex hypogeum and subsequent tiers.
Take your time and double-check connections; a strong foundation ensures a stable and impressive final model.
Constructing the Colosseum’s Base
Building the base involves a significant number of bricks, primarily focusing on creating the circular platform that defines the Colosseum’s footprint. This isn’t simply stacking layers; it’s about establishing a structurally sound and accurately shaped foundation; The instructions will detail a specific layering technique, utilizing various brick sizes and orientations for optimal stability.
Expect a repetitive process, but maintain focus on ensuring each layer is perfectly aligned with the previous one. This is where the overall shape begins to take form, and any inconsistencies will be noticeable later.
The base serves as the anchor for the entire model, so prioritize accuracy and a firm connection between each brick.
Creating the Underground Hypogeum
The Hypogeum, the Colosseum’s intricate underground network, is a fascinating build phase. It involves constructing a complex system of walls, corridors, and chambers beneath the arena floor. This section utilizes a variety of specialized LEGO pieces to replicate the historical structure’s functionality.
Pay close attention to the instructions as you build the supporting arches and walls, ensuring they are robust enough to support the weight above. The Hypogeum isn’t visible from the exterior, but its accurate construction is crucial for the model’s internal integrity.
This stage demands patience and precision, as it’s a densely packed area with many small details.
Phase 2: Building the Outer Walls
Now, we transition to constructing the majestic outer walls of the Colosseum, a visually striking phase. This involves meticulously assembling the first tier of arches, which form the foundational structure of the amphitheater’s exterior. Focus on accurately aligning the curved pieces to achieve the iconic Colosseum shape.
The building process requires careful attention to detail, as the arches are integral to the overall structural stability and aesthetic appeal. This stage introduces more complex building techniques, demanding precision and patience.
Begin detailing the exterior facade, adding texture and replicating the weathered appearance of the ancient monument.
Assembling the First Tier of Arches
The first tier of arches is crucial, forming the Colosseum’s base and defining its iconic silhouette. Begin by constructing individual arch segments, ensuring precise alignment of the curved LEGO bricks. These segments will later interlock to create the complete arches.
Pay close attention to the building instructions, as subtle variations in brick placement can impact the arch’s structural integrity. Regularly check for symmetry and stability as you build each arch, reinforcing connections as needed.
Once completed, carefully integrate the arches into the existing base structure, creating a continuous and visually impressive first tier. This is a foundational step!
Detailing the Exterior Facade
Once the foundational tiers are established, focus shifts to detailing the exterior facade, bringing the Colosseum’s historical accuracy to life. This involves meticulously applying various LEGO elements to replicate the weathered stone and intricate architectural features.
Utilize a range of brick colors and textures to simulate the effects of time and erosion on the Colosseum’s surface. Pay attention to the placement of smaller details, such as decorative moldings and recessed panels, to enhance realism.
Consistent application of these details across the entire facade is key to achieving a cohesive and visually stunning final product. This stage demands patience and precision!
Phase 3: Building the Second and Third Tiers
Now, the construction ascends with Phase 3, focusing on the second and third tiers of this magnificent structure. This phase requires careful attention to detail, as these levels showcase the iconic arches that define the Colosseum’s appearance.
Begin by constructing the second tier arches, ensuring structural integrity and alignment with the base. Then, meticulously add architectural details to Tier Two, replicating the columns and decorative elements found in the original Colosseum.
Finally, tackle the third tier and upper levels, continuing the pattern of arches and detailing. This stage builds upon previous work, creating a visually impressive and historically accurate representation.
Constructing the Second Tier Arches
The second tier’s construction centers around replicating the iconic arches, demanding precision and patience. Begin by assembling the foundational supports for each arch, ensuring they are firmly connected to the underlying structure. Utilize the provided LEGO pieces to carefully build each archway, paying close attention to symmetry and alignment.
Reinforce the arches with additional bricks, creating a robust and visually appealing design. Regularly check for stability throughout the process, as these arches form a crucial part of the Colosseum’s overall structure.
Remember to reference the instruction manual frequently to ensure accurate placement of each brick, achieving a historically inspired aesthetic.
Adding Architectural Details to Tier Two
Once the second tier arches are complete, focus on enriching the facade with intricate architectural details. This stage involves incorporating smaller LEGO elements to mimic the Colosseum’s original ornamentation, like pilasters and decorative moldings. Carefully attach these pieces to the archways and supporting walls, enhancing the visual complexity;
Pay attention to the subtle variations in design, replicating the historical accuracy of the structure. Utilize different brick textures and colors to create depth and realism. Regularly step back to assess the overall aesthetic, ensuring a harmonious blend of elements.
Refer to reference images of the real Colosseum for inspiration, striving for an authentic representation.
Building the Third Tier and Upper Levels
Constructing the third tier presents a unique challenge due to its reduced size and intricate detailing. Begin by assembling the foundational structure, ensuring it aligns perfectly with the lower tiers. This level requires precise placement of arches and supporting columns, demanding patience and accuracy.
The upper levels, representing the Colosseum’s attic story, involve building a series of smaller, decorative elements. These sections often feature windows and corniches, adding visual interest to the overall model. Focus on replicating the historical appearance, utilizing appropriate LEGO bricks and techniques.
Continuously check for symmetry and structural integrity throughout the build.
Phase 4: Completing the Colosseum Structure
Reaching the final phase signifies nearing completion of this monumental LEGO build! Now, focus on adding the finishing touches that truly bring the Colosseum to life. Begin by meticulously attaching the colonnades and numerous columns, ensuring consistent spacing and alignment for a realistic appearance.
Next, construct the seating areas, known as the cavea, carefully layering the tiers to represent the different social classes that once occupied them. Pay attention to the subtle curves and angles to accurately depict the amphitheater’s design.
Finally, step back and admire your nearly finished masterpiece, ready for display!

Adding the Colonnades and Columns
This stage demands precision and patience as you begin integrating the iconic colonnades and columns that define the Colosseum’s architectural grandeur. Carefully attach each column, ensuring proper alignment with the existing structure; slight misalignments become noticeable at this scale.
The instructions will guide you through the repetitive, yet crucial, process of building and securing each section of the colonnade. Focus on maintaining consistent spacing between the columns to replicate the original’s rhythmic pattern.
Remember to double-check connections for stability, as these elements contribute significantly to the model’s overall structural integrity and visual appeal.
Constructing the Seating Areas (Cavea)
The cavea, or seating area, is a complex undertaking, requiring meticulous attention to detail to capture the tiered structure of the Colosseum. Begin by establishing the foundational layers, carefully following the instructions to create the sloping platforms that support the seating.
This phase involves numerous smaller builds that interlock to form the larger sections of the stands. Pay close attention to the color variations and brick orientations, as these contribute to the realistic texture of the seating.
Ensure each tier is securely connected to the one below, creating a stable and visually convincing representation of the ancient Roman amphitheater’s seating arrangement.
Detailed Instructions for Specific Sections
Navigating the LEGO Colosseum’s complexity demands focused attention to specific areas. The gladiator entrance requires precise brick placement to recreate the arched passageways and detailed stonework, mirroring how gladiators entered the arena.
The Emperor’s Box, a symbol of power, necessitates careful construction of its elevated platform and decorative elements, reflecting its importance within the Colosseum’s hierarchy.
Animal pens, crucial for staging spectacles, involve building enclosed structures with intricate gate systems. Refer closely to the instruction manual’s diagrams for each section, ensuring accurate assembly and a historically inspired final model.
Building the Gladiator Entrance
Constructing the Gladiator Entrance demands meticulous attention to detail, as it represents a vital access point for performers. Begin by layering the foundational arch supports, ensuring structural integrity for the subsequent layers. Carefully position the dark grey and reddish-brown bricks to replicate the weathered stone appearance of the original Colosseum.
Pay close attention to the instruction manual’s guidance on creating the arched passageways, which were crucial for dramatic entrances. Incorporate the smaller tile pieces to simulate the textured walls and add depth to the structure.
Ensure proper alignment with the overall Colosseum base for a seamless integration, bringing the arena’s history to life.
Recreating the Emperor’s Box
The Emperor’s Box, a symbol of power and prestige, requires precise building techniques to capture its regal essence. Start by constructing a raised platform using layered brick combinations, ensuring it’s prominently positioned within the Colosseum’s structure. Utilize the light bluish-grey bricks to emulate the marble finish characteristic of imperial seating.
Focus on replicating the intricate detailing of the box’s facade, incorporating the smaller decorative elements to mimic the ornate carvings. Pay attention to the placement of the columns and railings, which defined the Emperor’s exclusive viewing area.
Accurate scaling and alignment are crucial for a historically accurate representation, adding a touch of Roman grandeur to your LEGO masterpiece.
Constructing the Animal Pens
Beneath the arena floor, the hypogeum housed a complex network of tunnels and animal pens. Recreate this hidden world using a combination of dark grey and brown LEGO bricks to simulate the stone and wooden structures. Focus on building sturdy, enclosed spaces representing the holding cells for gladiators and wild animals.
Pay close attention to the layout, mirroring the historical design with interconnected chambers and access points leading to the arena floor. Utilize smaller brick elements to create gates and barriers, suggesting the controlled release of animals during spectacles.
Detailing these underground areas adds a layer of realism and historical accuracy to your LEGO Colosseum, showcasing the logistical marvel of ancient Roman entertainment.
Tips and Tricks for a Smooth Build
Given the immense 9,036-piece count, organization is paramount. Employ LEGO sorting techniques – separate pieces by color, type, or even bag number. This dramatically reduces search time and frustration. Work in well-lit, spacious areas to avoid losing small components.
Break down the build into manageable phases, focusing on completing sections before moving on. Regularly double-check your work against the instructions, especially during repetitive steps. Don’t rush; patience is key to a successful build.
Utilize online resources and communities for support if you encounter difficulties. Remember, tackling this project is a marathon, not a sprint!

Dealing with the High Piece Count
The LEGO Colosseum’s staggering 9,036 pieces present a unique challenge. Effective organization is crucial; don’t attempt to build directly from the open bags. Invest in sorting trays or containers to categorize pieces by type and color – a significant time saver.
Consider building in stages, completing smaller sections before tackling larger assemblies. This prevents feeling overwhelmed by the sheer volume of bricks. Regularly inventory your progress to ensure no pieces are misplaced.
Accept that this build will require dedicated time and patience. Embrace the process and enjoy the journey of constructing this monumental LEGO model!
Using LEGO Sorting Techniques
Given the Colosseum’s 9,036 pieces, mastering LEGO sorting is paramount. Begin by separating pieces by type – bricks, plates, tiles, arches, and specialized elements. Further refine by color within each type; this dramatically speeds up finding specific components during construction.
Utilize multiple containers or trays, labeling each clearly. Consider a system based on the instruction manual’s part lists. For repetitive builds, create “kits” containing all the pieces needed for a specific step.
Don’t underestimate the power of a well-organized workspace. A methodical approach to sorting transforms a daunting task into a manageable, even enjoyable, part of the building experience.
Troubleshooting Common Building Issues
With a set of this magnitude, encountering minor issues is inevitable. Incorrect piece placement is common; carefully retrace steps using the instruction manual. If a piece feels forced, stop – forcing can damage components.
Missing pieces, though rare, can occur. Double-check your sorted inventory and review the build steps. LEGO’s customer service is excellent for replacements. Stability concerns? Ensure connections are firm and symmetrical, particularly in the arches.
Frustration is natural! Take breaks, revisit earlier sections, and remember the immense satisfaction of completing this iconic model. Patience and a systematic approach are key to overcoming challenges.
Displaying Your LEGO Colosseum
Your completed LEGO Colosseum deserves a prominent display! Choose a stable, spacious location away from direct sunlight to prevent fading. Consider a dedicated room or a reinforced shelf capable of supporting its substantial weight.
Enhance the presentation with strategic lighting. LED strip lights placed beneath or around the model can highlight architectural details and create a dramatic effect. A rotating display base adds another layer of visual interest.
Protect your investment from dust with a custom-built acrylic display case. Regular, gentle dusting with a soft brush will maintain its pristine condition for years to come, preserving this magnificent build.
Choosing the Right Display Location
Selecting the ideal location for your LEGO Colosseum is crucial, given its impressive size and weight. Prioritize a sturdy, level surface capable of supporting approximately 15 pounds. Avoid areas prone to vibrations or accidental bumps;
Consider visibility and accessibility. A central location allows for appreciation from all angles, while sufficient space around the model facilitates dusting and maintenance. Protect it from direct sunlight, which can cause discoloration over time.
Think about the surrounding décor. A neutral backdrop will accentuate the Colosseum’s intricate details. Ensure adequate lighting to showcase its architectural grandeur, making it a true centerpiece of your collection.
Lighting Options for Enhanced Presentation
Elevate your LEGO Colosseum’s display with strategic lighting. Subtle, diffused illumination highlights the model’s architectural details without harsh shadows. LED strip lights placed beneath or behind the structure create a dramatic effect, emphasizing its scale and grandeur.
Consider spotlights to accentuate specific features, like the arches or the Emperor’s Box. Warm white LEDs mimic natural light, enhancing the Colosseum’s aged appearance. Avoid overly bright lights, which can wash out the intricate textures.
Experiment with color-changing LEDs for a dynamic display, but use them sparingly to maintain a realistic aesthetic. Remember to conceal the light sources for a clean, professional look, truly showcasing your building achievement.
Maintaining and Dusting Your Model
Preserving your magnificent LEGO Colosseum requires gentle care. Dust accumulation is inevitable, but can be minimized with preventative measures. Regularly use a soft-bristled brush or a microfiber cloth to gently remove dust from the surface, avoiding excessive pressure.
Compressed air can effectively dislodge dust from hard-to-reach areas, like the arches and intricate details. Avoid using water or cleaning solutions, as they can damage the LEGO bricks. For stubborn dirt, a slightly damp cloth can be used cautiously, followed by immediate drying.
Consider a display case to protect your Colosseum from dust and accidental damage, ensuring its longevity and pristine condition for years to come.