Article Plan: Mini Pizza Bagels Cooking Instructions (as of 12/27/2025 03:46:46)

This detailed guide unveils the secrets to crafting delightful mini pizza bagels, boasting a 53% hydration dough and a simple, yet effective, preparation process.
Mini pizza bagels represent a fantastic fusion of two beloved comfort foods: the chewy goodness of a bagel and the irresistible flavors of pizza. These bite-sized treats are incredibly versatile, perfect for quick breakfasts, satisfying lunches, or fun snacks. They offer a delightful textural experience – a slightly crisp exterior giving way to a soft, chewy interior, all topped with your favorite pizza fixings.
This recipe aims to guide you through creating restaurant-quality mini pizza bagels in your own kitchen, with minimal effort and maximum flavor. We’ll be focusing on a straightforward dough recipe, achieving that authentic bagel texture through a crucial boiling step, and, of course, customizing with your preferred toppings. Get ready to enjoy a homemade delight that’s sure to become a family favorite!
Why Make Mini Pizza Bagels?
The appeal of mini pizza bagels lies in their convenience, customizability, and sheer deliciousness. They’re significantly faster to prepare than traditional pizzas, making them ideal for busy weeknights or spontaneous cravings. Their smaller size makes them perfect for portion control and kid-friendly snacking, offering a satisfying treat without overindulgence.
Beyond speed and convenience, mini pizza bagels allow for endless topping combinations. From classic pepperoni and mozzarella to more adventurous options like pineapple and jalapenos, you’re in complete control. Making them at home also guarantees fresh, high-quality ingredients, avoiding the processed elements often found in store-bought versions. Ultimately, crafting these mini delights is a fun, rewarding experience that delivers a truly satisfying result!
Understanding the Recipe – A Quick Overview
This recipe centers around a 53% hydration dough, utilizing bread flour for optimal gluten development and a chewy texture. The process involves blooming yeast, kneading for 10-12 minutes to achieve a smooth, elastic dough, and two proofing stages – a bulk fermentation and a final rise. A crucial step is boiling the shaped bagels in a baking soda and honey solution, which gelatinizes the exterior for a signature chewy crust and beautiful browning.
Baking occurs at a high temperature (460°F) for 17-19 minutes. Toppings are best added after the boiling process, using large flakes to prevent burning; The recipe yields approximately six 125g bagels, easily adjustable to suit your preference. Success hinges on proper kneading, sufficient proofing, and the essential boiling step – each contributing to the final, delightful mini pizza bagel.
Ingredients Breakdown
For the dough, you’ll need 260 grams of warm water (90-100°F), 490 grams of bread flour, 8 grams of active dry yeast, 1 tablespoon of brown sugar, and 10 grams of salt. These components work in harmony to create a pliable and flavorful base for our mini bagels.
Regarding toppings – the pizza style – the possibilities are endless! While the core recipe focuses on the bagel itself, consider your favorite pizza ingredients. This includes pizza sauce, mozzarella cheese (low-moisture, part-skim is recommended), pepperoni, cooked sausage, mushrooms, bell peppers, or any other desired pizza toppings. Remember that larger flakes of seasoning adhere better and are less prone to burning during baking. The quality of your toppings will directly impact the final flavor profile.

Dough Ingredients
The foundation of our mini pizza bagels begins with carefully selected dough ingredients. You will require 260 grams of warm water, ideally between 90-100 degrees Fahrenheit, to activate the yeast. 490 grams of bread flour provides the necessary gluten structure for a chewy texture.

To initiate the fermentation process, 8 grams of active dry yeast are crucial, complemented by 1 tablespoon of brown sugar to feed the yeast. Finally, 10 grams of salt not only enhances flavor but also controls the yeast’s activity and strengthens the gluten network. These precise measurements ensure a dough that’s both manageable and yields a delightful, bagel-like consistency, ready for shaping and topping.
Topping Ingredients (Pizza Style)
While the possibilities are endless, achieving that classic pizza flavor requires a few key toppings. The base, of course, is pizza sauce – choose your favorite, whether it’s a simple marinara or a more robust tomato sauce.
Mozzarella cheese is non-negotiable, providing that signature stretch and creamy texture. For added flavor, consider incorporating other cheeses like provolone or parmesan. Pepperoni is a classic choice, but feel free to experiment with other toppings such as cooked sausage, mushrooms, bell peppers, onions, or olives. Remember to use larger flakes of seasoning; smaller particles tend to burn during baking. A sprinkle of dried oregano or Italian seasoning elevates the overall taste profile, completing the pizza experience on your mini bagels.
Dough Preparation – Step-by-Step
Creating the perfect dough is fundamental to exceptional mini pizza bagels. Begin by warming 260 grams of water to 90-100°F. Combine this with 8 grams of active dry yeast and 1 tablespoon of brown sugar, allowing it to bloom for 5-10 minutes – you’ll notice a foamy texture when ready.
In a separate bowl, whisk together 490 grams of bread flour and 10 grams of salt. Gradually incorporate the flour mixture into the yeast mixture, mixing until a shaggy dough forms. It will initially be crumbly, but persistent kneading for 10-12 minutes is crucial. This develops the gluten, resulting in a smooth, elastic dough that passes the windowpane test. Place the dough in an oiled bowl, cover, and let it rise until increased by 50-75%.
Blooming the Yeast
Blooming the yeast is a vital first step, ensuring its activity and contributing to a successful rise. Begin with 260 grams of warm water, heated to a temperature between 90-100 degrees Fahrenheit – this warmth awakens the yeast without killing it. To this warm water, add 8 grams of active dry yeast and 1 tablespoon of brown sugar.
Gently stir to combine, then allow the mixture to rest undisturbed for 5-10 minutes. During this time, the yeast will consume the sugar and produce carbon dioxide, resulting in a foamy or bubbly layer on top. This foam indicates that the yeast is alive and active, ready to leaven the dough. If no foam appears, the yeast may be old or the water too hot/cold, requiring a fresh start.
Mixing the Dough
Once the yeast is bloomed, it’s time to combine it with the flour and salt to form the dough. In a large bowl, or the bowl of a stand mixer, combine 490 grams of bread flour with 10 grams of salt. Whisk briefly to distribute the salt evenly throughout the flour.
Slowly incorporate the bloomed yeast mixture into the flour, mixing until a shaggy dough begins to form. Be prepared – the dough will initially appear very crumbly and dry. This is normal! Continue mixing, either by hand or with the dough hook attachment, gradually bringing the dough together. Patience is key; full incorporation takes time and effort, resulting in a cohesive dough base.
Kneading the Dough (10-12 Minutes)
Now comes the crucial step of developing the gluten structure: kneading. Whether by hand on a lightly floured surface or using a stand mixer with a dough hook, knead the dough vigorously for 10-12 minutes. Initially, it will be sticky and rough, but persistent kneading will transform it.
As you knead, the dough will become smoother, more elastic, and less sticky. Continue until it passes the “windowpane test” – meaning you can stretch a small piece of dough thin enough to see light through it without tearing. This indicates sufficient gluten development, essential for a chewy bagel texture. A strong gluten structure is vital for holding the bagel shape during boiling and baking.
First Rise – Proofing the Dough
After kneading, place the dough into a lightly oiled bowl, turning to coat all sides. This prevents sticking and ensures even rising. Cover the bowl tightly with plastic wrap or a damp kitchen towel to maintain humidity. Now, allow the dough to rise in a warm place until it has increased in size by approximately 50-75%.
This first rise, or bulk fermentation, typically takes 1-2 hours, depending on the room temperature. A warmer environment will accelerate the process. This stage allows the yeast to work its magic, developing flavor and creating air pockets within the dough. Don’t rush this step; proper proofing is key to a light and airy bagel!
Shaping the Mini Bagels
Once the dough has risen, gently remove it from the bowl and prepare for shaping. Begin by dividing the dough into 6 equal pieces, each weighing approximately 125 grams – adjust the size based on your preference for mini bagel dimensions. Flatten each piece to release any trapped air, then shape it into a tight, smooth ball. Allow these balls to rest, covered, for 5-10 minutes; this relaxes the gluten, making shaping easier.
For the classic bagel shape, press a hole through the center of each ball with your thumb. Then, using two fingers on each side of the hole, gently stretch and widen it to about two inches in diameter. Remember the dough will shrink back during proofing, so aim for a slightly larger hole initially. Ensure a symmetrical ring shape for even baking.
Dividing the Dough (125g Pieces)
After the first rise, carefully remove the dough from the oiled bowl. Gently deflate it to release the built-up gases. Now comes the crucial step of portioning the dough for consistent mini bagels. Using a kitchen scale is highly recommended for accuracy. Aim for 6 equal pieces, each weighing approximately 125 grams. This weight will yield nicely sized mini bagels, but feel free to adjust based on your desired portion size – larger pieces will create bigger bagels, and smaller pieces, smaller ones.
Precision in dividing ensures even baking and a uniform final product. Take your time and ensure each piece is as close to 125g as possible. Consistent sizing contributes to a visually appealing batch of mini pizza bagels and guarantees they cook at the same rate.
Pre-Shaping into Balls
Once you’ve divided the dough into 125g pieces, the next step is pre-shaping them into tight, smooth balls. This initial shaping builds surface tension, which is essential for achieving the classic bagel shape. Gently flatten each piece of dough to knock out any remaining air bubbles – this prevents large holes in the final product. Then, using your hands, carefully pull the edges of the dough inwards and downwards, rotating as you go.
The goal is to create a round, taut ball. Don’t worry about perfection at this stage; it’s more about developing some initial structure. Once shaped, place the balls seam-side down on a lightly floured surface. Allow them to rest, covered loosely with plastic wrap or a clean kitchen towel, for 5-10 minutes. This rest period allows the gluten to relax, making the final shaping process much easier.
Creating the Bagel Hole & Ring Shape
After the rest, it’s time to form the signature bagel shape! Gently pick up one of the dough balls. Using your thumbs, press a hole through the center, being careful not to push all the way through to the work surface. The initial hole will appear quite large, but remember the dough will shrink back during the final proofing stage.
Now, gently widen the hole. Place two fingers on opposite sides of the hole and slowly stretch and rotate the dough, aiming for a diameter of about two widths of your finger. Focus on creating a symmetrical ring shape. Consistent pressure is key to avoid uneven thickness. Repeat this process with each dough ball, placing the shaped bagels onto a floured baking sheet, ensuring they don’t touch.
Second Proof – Final Rise (30-45 Minutes)
Now comes the crucial second proofing stage, allowing the bagels to achieve their light and airy texture. Cover the shaped mini bagels loosely with plastic wrap or a clean kitchen towel. This prevents them from drying out while still allowing for expansion. Place the baking sheet in a warm, draft-free location – a slightly warmed oven (turned off!) works wonderfully.
Allow the bagels to rise for 30 to 45 minutes. You’re looking for a noticeable puffiness, but avoid letting them double in size. Over-proofing can lead to a collapse during the boiling process. Gently poke a bagel; it should spring back slowly, leaving a slight indentation. This indicates they’re ready for the next step – the boiling bath!
The Boiling Process – Key to Bagel Texture
The boiling step is non-negotiable for achieving that authentic bagel chew! It gelatinizes the starches on the surface, creating a slightly firm exterior that contrasts beautifully with the soft interior. Fill a large pot with plenty of water – enough to comfortably submerge the mini bagels.

Add 2 tablespoons of baking soda and 2 tablespoons of honey to the boiling water. The baking soda encourages blistering, resulting in a beautifully textured crust, while the honey contributes a subtle sweetness and enhanced browning. Gently lower the bagels into the boiling water, being careful not to overcrowd the pot. Boil for 45 seconds to 1 minute per side. Remove with a slotted spoon and allow to cool slightly before topping and baking.
Preparing the Boiling Water (Baking Soda & Honey)
Creating the correct boiling water is crucial for achieving that signature bagel texture. Begin with a generously sized pot – ensuring ample space for the mini bagels to move freely during the boiling process. Fill it with water and bring it to a rolling boil over high heat.
Once boiling, carefully add 2 tablespoons of baking soda and 2 tablespoons of honey. The baking soda is the key to blistering the bagel’s surface, creating those desirable bubbles and a slightly chewy crust. The honey contributes a touch of sweetness and aids in browning during baking. Stir well to fully dissolve both ingredients before gently adding the proofed mini bagels.
Boiling Time (45 Seconds ⎼ 1 Minute per Side)
The boiling step isn’t about cooking the bagels through; it’s about setting the exterior. Gently lower the proofed mini bagels, one or two at a time, into the boiling water. Avoid overcrowding the pot to maintain the water temperature.
Boil each bagel for 45 seconds to 1 minute per side. Use a slotted spoon or spider to carefully flip them over. This brief boil gelatinizes the outside, creating a slightly chewy texture and allowing for faster, more even browning in the oven. After boiling, remove the bagels and place them on a wire rack to cool slightly before proceeding to the baking stage. Don’t skip this step!
Baking the Mini Bagels
Now it’s time to transform those boiled bagels into golden-brown perfection! Preheat your oven to 460 degrees Fahrenheit (238 degrees Celsius). Ensure your oven rack is positioned in the center for even heat distribution.
Bake the mini bagels for 17-19 minutes. Keep a close watch during the last few minutes to prevent burning. The bagels should be a rich golden brown color. Once baked, remove them from the oven and let them cool slightly on a wire rack. This is the ideal time to add your pizza toppings, as the bagels will hold them better when slightly cooled. Enjoy the delightful aroma and prepare for a delicious treat!

Oven Temperature (460 Degrees)
Achieving the perfect bagel texture hinges on a precise oven temperature. We recommend setting your oven to 460 degrees Fahrenheit (approximately 238 degrees Celsius). This high heat is crucial for creating that desirable golden-brown crust and a slightly chewy interior – hallmarks of a truly excellent bagel.
Preheating is essential! Allow your oven to fully reach 460°F before introducing the bagels. An underheated oven will result in pale, lackluster bagels that lack the proper texture. Consistent temperature ensures even baking and optimal rise. Monitor closely, as ovens can vary, and adjust baking time accordingly if needed to achieve the perfect color and texture.
Baking Duration (17-19 Minutes)
Once the bagels have undergone the boiling process, it’s time to finish them in the oven. Bake for a duration of 17 to 19 minutes at 460 degrees Fahrenheit. Keep a watchful eye on them during the final few minutes, as baking times can slightly vary depending on your oven’s calibration and the size of your mini bagels.
Look for a deep golden-brown color. This indicates a fully baked bagel with a delightfully crisp exterior. The bagels should also sound hollow when tapped on the bottom. If they’re browning too quickly, reduce the oven temperature slightly. Allow the baked bagels to cool slightly on a wire rack before adding your desired pizza toppings for the ultimate mini pizza bagel experience!
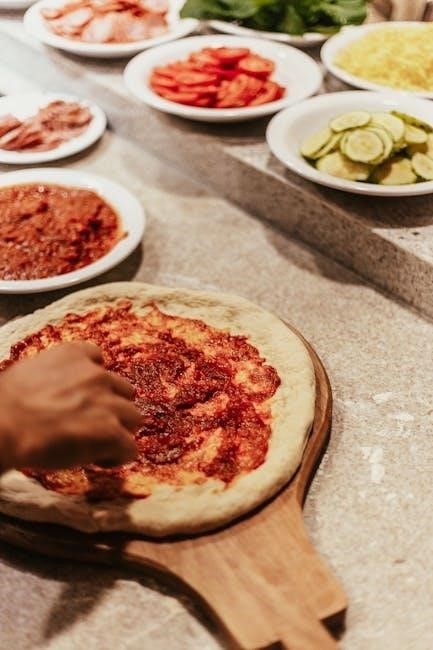
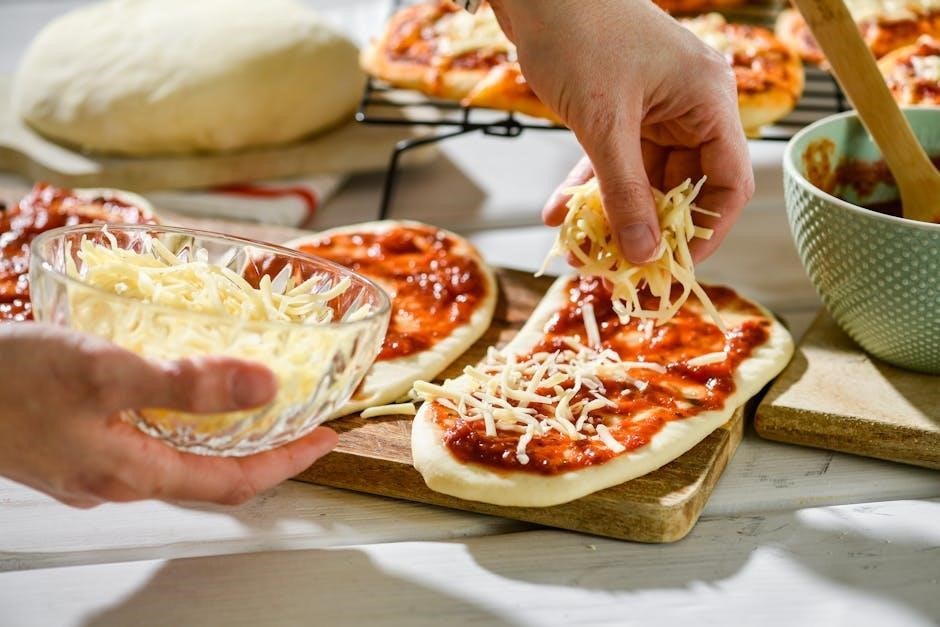
Adding Pizza Toppings
The optimal time to adorn your mini bagels with pizza toppings is immediately after their water bath, while they are still slightly damp. This allows the toppings to adhere more effectively during baking, ensuring a secure and flavorful finish. However, seasoning can also be done after baking.
We recommend utilizing larger flakes of seasoning, as smaller particles tend to burn at the high baking temperature. Consider classic pizza toppings like shredded mozzarella, pepperoni slices, Italian seasoning, or a sprinkle of parmesan cheese. Get creative and experiment with your favorites! Remember, these are mini pizzas, so a little topping goes a long way. Enjoy the customization!
Best Time to Add Toppings (After Water Bath)
Applying toppings directly after the boiling process, while the bagel surface remains moist, is crucial for optimal adhesion. The slight dampness creates a natural “glue” that helps the toppings meld beautifully with the bagel as it bakes. This prevents toppings from sliding off during the high-temperature baking phase, ensuring every bite is packed with flavor.
Delaying topping application until after baking is also viable, particularly for larger or more delicate ingredients. However, this method relies on the residual warmth of the bagel to slightly soften and adhere the toppings. For the most secure and integrated topping experience, the post-boil application is highly recommended for maximum pizza perfection!
Recommended Toppings
The possibilities are endless when it comes to topping your mini pizza bagels! Classic choices like generous amounts of shredded mozzarella, vibrant tomato sauce, and flavorful pepperoni never disappoint. For a bolder taste, consider adding sliced Italian sausage, crispy bacon bits, or sautéed mushrooms.
Don’t shy away from experimenting with different cheeses – provolone, cheddar, or even a sprinkle of parmesan can elevate the flavor profile. Fresh herbs like basil or oregano, added after baking, provide a delightful aromatic finish. Remember to use big flakes of seasoning; smaller particles tend to burn during baking. Embrace your creativity and build your dream mini pizza bagel!
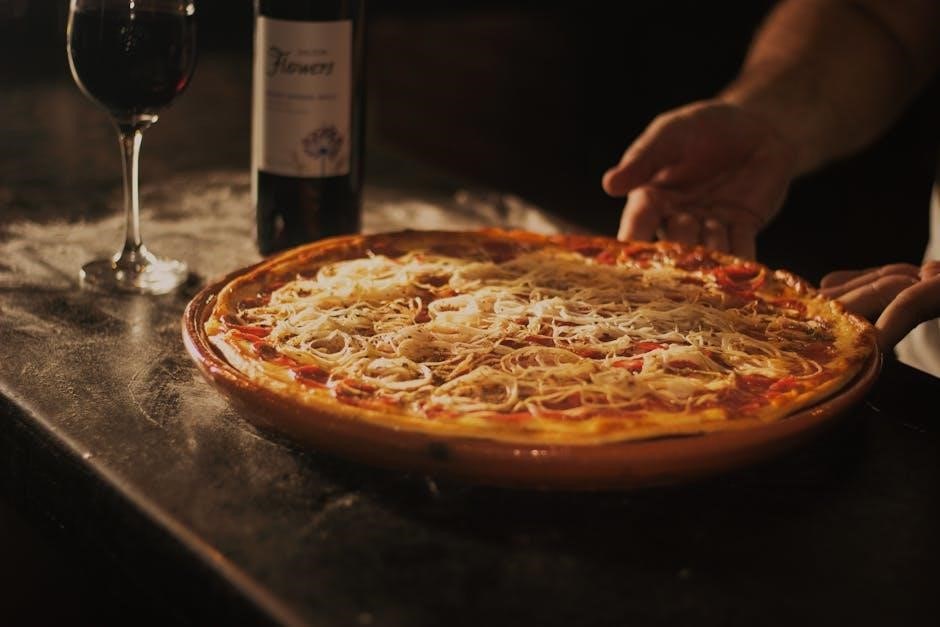
Cooling and Serving
Once your mini pizza bagels emerge from the oven, resist the immediate urge to dive in! Allowing them to cool slightly – about 5-10 minutes – is crucial. This prevents burning your mouth and allows the cheese to set, making for a cleaner bite. Transfer the bagels to a wire rack to ensure even cooling and prevent sogginess on the bottom.
Serving these delightful treats is simple. They’re perfect as a quick snack, a fun appetizer for gatherings, or even a light meal. Pair them with a side salad or a refreshing beverage. Don’t hesitate to enjoy them warm! The combination of the chewy bagel, melted cheese, and your favorite toppings is truly irresistible.
Tips for Perfect Mini Pizza Bagels
Achieving bagel perfection requires attention to detail. Ensure your water is warm (90-100°F) for optimal yeast activation. Don’t skimp on the kneading – 10-12 minutes are essential for developing a strong gluten structure, resulting in a chewy texture. The window-pane test is your friend!
When boiling, don’t overcrowd the pot. Work in batches to maintain water temperature. Remember, the dough will shrink back when forming the bagel hole, so make it slightly larger than desired. Use large flake seasonings after the water bath to prevent burning. Finally, a slightly underbaked bagel is preferable to an overbaked one – they continue to cook slightly as they cool.
Troubleshooting Common Issues
Dough too sticky? Add flour, one tablespoon at a time, during kneading. Dough not rising? Ensure your yeast is fresh and the water temperature is correct. A warmer spot can also help proofing. Bagels too dense? Insufficient kneading or proofing are likely culprits – allow for a longer rise time.
Bagels burning before cooking through? Lower the oven temperature slightly or reduce baking time. Bagels lacking color? Increase the honey in the boiling water. Hole closing up during boiling? Gently reshape the hole after the initial boil. Remember, a slightly imperfect bagel still tastes delicious – don’t be afraid to experiment!
Variations & Flavor Combinations
Beyond classic pizza, explore endless possibilities! Try everything bagel seasoning before baking for a savory twist. Add garlic powder or Italian herbs to the dough for enhanced flavor. For a spicy kick, incorporate red pepper flakes into your toppings.
Cheese lovers can experiment with mozzarella, cheddar, provolone, or a blend. Gourmet options include pesto and sun-dried tomatoes, or caramelized onions and goat cheese. Sweet variations are also possible – cinnamon sugar after the water bath creates delightful mini cinnamon bagels. Don’t hesitate to get creative with your favorite pizza combinations and personalize these mini bagels to your taste!
Storage Instructions
For optimal freshness, consume your mini pizza bagels immediately after baking. However, leftovers can be stored properly. Allow the bagels to cool completely before transferring them to an airtight container. They will maintain a reasonable texture for up to 2 days at room temperature.
For longer storage, freeze the baked bagels. Wrap them individually in plastic wrap, then place them in a freezer-safe bag or container. Frozen bagels can last for up to 2 months. To reheat, thaw completely and then briefly toast or warm in the oven to restore some of their original crispness. Avoid refrigerating, as this can make them stale.